Introduction:
In the realm of virtual meetings, webinars, and online presentations, the reliability of your Mac’s microphone is paramount. However, even the most robust systems can encounter glitches, leaving users scrambling to troubleshoot amidst critical discussions. This guide presents a strategic approach to preemptive measures and immediate actions, ensuring seamless microphone functionality during live sessions. By prioritizing practical solutions and leveraging built-in tools, users can navigate audio-related challenges with confidence, minimizing disruptions and maximizing productivity. Whether you’re a moderator or a first-time participant, optimizing your Mac’s microphone performance is essential for delivering impactful communication in the live sessions. By following these prioritized steps, you can effectively troubleshoot and resolve the issue of your Mac microphone cutting out. Immediate actions offer quick fixes, while best practices ensure your setup is optimal before live sessions.
Best Quick Fixes (Recommended When It Occurs in the Middle of the Live Session)
Here are three recommended workarounds for addressing such situations promptly.
1. Refreshing the session link in the same tab (not a new tab)
When encountering an issue, you can refresh the page to return to the pre-test page and then rejoin the session. Please send a message to the participant/moderator in the chat in Userlytics platform, asking them to stay in the session and not close the tab while you are rejoining and make sure to refresh the page(session link) in the same tab and avoid refreshing in a new tab, as it might cut you off from the session.
2 . Switch Audio Devices:
When encountering microphone issues, quickly switch from built-in speakers to a headset or vice versa. This immediate action often resolves connectivity or compatibility issues, restoring audio functionality without interrupting ongoing discussions.
3. Using Terminal to Reset Core Audio Issues:
In cases where the macOS Core Audio system experiences a malfunction, using Terminal to restart the coreaudiod process can help resolve audio-related issues. This command refreshes the audio subsystem, potentially fixing bugs or conflicts affecting microphone functionality.
Open Terminal (Applications > Utilities > Terminal).
Enter the command:
sudo killall coreaudiod
to restart the Core Audio process. If needed, you may need to enter your password and press enter again.
Best Practices Before Joining Live Sessions:
Use Built-in Microphone:
Reason: Built-in microphones are typically more reliable because they are specifically designed to work seamlessly with your device’s hardware and software. External microphones, while they may offer better sound quality, can sometimes face hardware or compatibility issues that can affect their performance.
Update macOS and Drivers:
Reason: Ensures all software is up-to-date with the latest bug fixes.
How-To: Go to System Preferences > Software Update. Install any available updates.
Enable Dictation:
Reason: Activates microphone drivers and resolves issues.
How-To: Go to System Preferences > Keyboard. Enable Dictation.
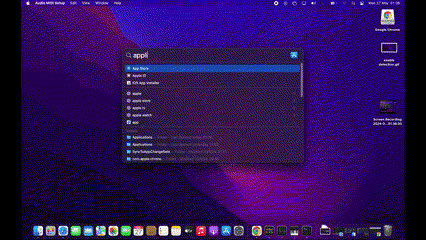
Check Audio MIDI Setup:
Reason: Optimizes settings for audio performance.
How-To: Open Audio MIDI Setup (Applications > Utilities > Audio MIDI Setup). Verify correct output format settings. For most consumer audio devices, a sample rate of 44.1 kHz (CD quality) or 48 kHz (DVD and digital television quality) is standard and should work well in most situations. 16-bit is standard for CD-quality audio and is sufficient for most consumer applications.
Run Apple Diagnostics:
Reason: Identifies hardware issues affecting microphone functionality.
How-To: Restart your Mac and hold down the D key until Apple Diagnostics screen appears.
Disable Browser Extensions:
Extensions can conflict with system processes, affecting the microphone.
How-To: Disable browser extensions as much as possible in browser settings to avoid any issues due to this point.
Disable VPN
Reason: VPNs can conflict with system processes and affect network connectivity or microphone usage. How-To: Disable the VPN in your system or application settings to avoid any issues due to this point.
- For System VPN (macOS/Windows):
- Open your system settings.
- Navigate to Network & Internet (Windows) or Network (macOS).
- Disable the VPN connection.
- For VPN Applications:
- Open the VPN app you’re using.
- Look for a toggle or disconnect button to disable the VPN.
- For Browser VPN Extensions:
- Open the browser.
- Go to the Extensions settings.
- Locate the VPN extension and either disable or remove it.
Reinstall/Update Browsers:
Reason: Outdated or corrupt browser installations may cause compatibility issues.
How-To: Follow the steps outlined in the following article > Update Google Chrome
Terminate Resource-Intensive Processes:
Reason: High CPU/Memory usage can affect audio performance.
How-To: Open Activity Monitor, check CPU and Memory tabs, and terminate resource-intensive processes.
Terminate Resource-Intensive Processes.mov
Reset NVRAM/PRAM:
Reason: Resolves deeper system-level issues affecting audio.
How-To: Shut down Mac, hold Command + Option + P + R for about 20 seconds, release keys and let Mac restart.
Warning: It is generally safe to reset your PRAM or NVRAM, but please note that many system features will revert to their original factory settings. We recommend backing up important data before performing the reset.
Check for Malware:
Reason: Malicious programs may affect microphone functionality.
How-To: Dsibale malware or firewall as they might be blocking the connections.
Log information in Console
In case you experience sound cutting in and out on your macOS mic, please make sure to run the Console app before the moderated session starts. Once the session is finished, remember to pause the Console app and send us the log information under “All Messages.” This will allow us to gain a clearer understanding of the issue you’re encountering with your macOS device.
View log messages in Console on Mac
Contacting Apple Support:
If the issue persists after following the aforementioned steps, it may be necessary to engage in more comprehensive troubleshooting and seek professional support. Contacting Apple Support may be required to identify any potential overlooked issues.
Reminder: Why does the microphone on macOS sometimes not working during Userlytics Moderated sessions?
MacBook microphones are known for their reliability and durability, but occasional issues can arise. This article provides solutions for troubleshooting microphone problems on Mac devices. It’s important to note that this is a known issue in macOS and similar issues have been reported on other platforms, such as Microsoft Teams, and Zoom, and this is not unique to Userlytics platform. For more information and discussions on this topic, please check out the following URLs.
Apple
Microsoft
- Microphone and Speaker Dropping Out on Teams on Mac
- Teams audio cutting out with audio interface for video conferencing
Discord
Zoom
If you have any questions or require further assistance, feel free to reach out to support@userlytics.com , we are here to help!
Kind regards,
Userlytics Support Team