
Meet PAM – Userlytics new and improved Project and Account Management system. PAM has been designed to make it easier than ever to manage your accounts, segment studies and projects by “Teams” and research goals, assign different user roles, and manage external stakeholder access and viewing/editing capabilities through the new permissions system.
In this help post, we’ll teach you more about this new system, and how it can help you organize and make the most of your Userlytics account.
What Benefits Does PAM Offer?
PAM offers an array of benefits to Userlytics account holders. It makes it easier than ever to keep track of multiple team members, projects and/or studies. You’ll love the improved searchability, sorting and navigation features that let you find exactly what you need in seconds. And PAM’s simplified credit system takes the guesswork out of managing pricing for each type of study and service.
Here is a list of benefits offered by Userlytics’ new Project and Account Management System:
- Ability to create teams to segment different departments, divisions, user groups and clients (for agencies) by goals, and distribute credits accordingly.
- Ability to segment studies by projects.
- Ability to assign different user roles to each member.
- Ability to leverage the new permissions system to invite a new type of user, “viewers”.
- Improved searchability for specific teams, studies, or projects using filters.
- Ability to sort by study name, date, status, creator, or study type.
- Improved and revamped UI for added efficiency.
- Simplified credit system that makes it easier to understand and manage pricing for each type of study and service (Note: This does not imply any type of price increase, current pricing per service/study type remains the same or even lower in some cases).
How do I Navigate Across the New Project and Account Management System?
The upgraded look and feel of our Project and Account Management System is designed to help you make the most out of your Userlytics account.
We’ve introduced a more efficient list view to replace the card view, as well as optimized our color scheme and navigation. Userlytics account holders now have access to the three critical components of their account immediately upon logging into PAM – the General Dashboard, the Team Dashboard, and the Project Dashboard – making it simple to monitor projects, manage their teams and identify specific studies through new filter features!
Three Dashboards that Meet your Unique Account Needs
PAM offers Userlytics users three unique dashboards to organize all of the important account information: the General Dashboard, the Team Dashboard (available in the multi-team version), and the Project Dashboard.
Let’s dive into what each of these dashboards look like, and how you can use them to your advantage.
General Dashboard
The General Dashboard is what you will see upon logging in to your client dashboard. The first page is designed to help you quickly access your most recent studies.
Additionally, from this page, you can easily filter out information by going directly to your projects or teams (available in multi-team Version). This allows you to quickly find the information you need and get started on your work.

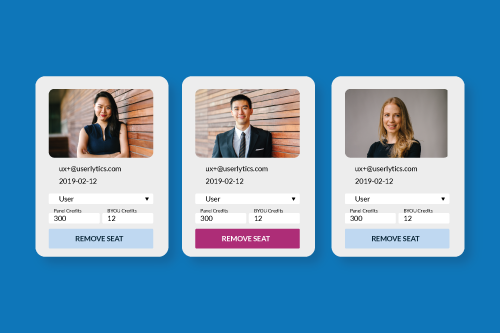
How do I Invite and Assign Members to my Company in the New Project and Account Management System?
With the new system, you can easily add or remove members to your account, assign roles to each member, or appoint admin status to different members. To do so, you will simply need to select the “Add Member” prompt on the Company Settings page.
To locate this prompt as a Super Admin, select Company Settings from the drop down arrow next to your account name (top right corner of the dashboard).

Then, select the “Members” tab from the list on the left hand side.

From here, just input your new member’s information! At this stage you may choose to assign roles or account status (admin) to your new member, alongside the team this new member belongs to.

Team Dashboard (available in multi-team version)
If you plan to have multiple teams within your Userlytics account, you may decide to opt for the multi-team version of our Project and Account Management System, which includes the Team Dashboard. (Note: There is no additional cost to benefit from this capability).
With the Team Dashboard, you can easily configure each team or open and create new projects within each team. When you have many projects, you can search for specific ones or sort them by date, number of studies, or visibility. Additionally, users have the ability to move projects to other teams or combine multiple projects into one from the team dashboard.

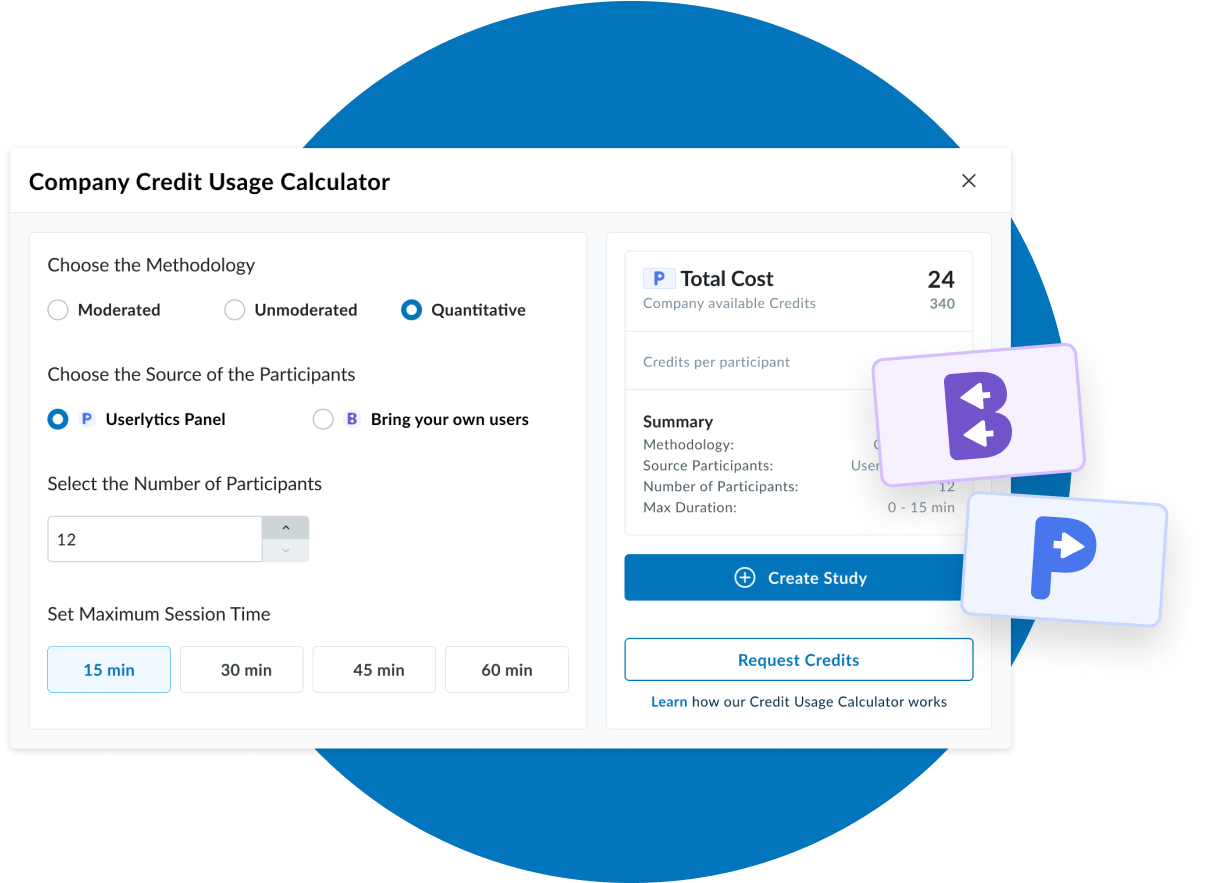
How do I Manage my Team Credits
Within the new system, credits can be assigned by Admin users. When a member receives credits, their allocation to projects will depend upon whether you have chosen a single-team or a multi-team account.
For a single team account, credits are automatically assigned to the only available team and can be used or allocated to projects or studies as desired. For a multi-team account, credits will remain unassigned and can be moved by an account administrator to different teams, allowing for full control of credit usage.
Allocating credits is quick and is accessible through the “Company Settings” page. To access this page, select “Company Settings” from the drop down arrow next to your account name (top right corner of the dashboard).

From this screen, select “Credits” from the list on the left hand side of the screen.

You can then choose the “Assign Credits” prompt located by the “Panel Credits” section of the page. From here, simply allocate your available credits to your desired project.


You may also elect to purchase more credits at this point, which can be done easily by selecting the “Need more” button on the top right-hand corner of the screen.

Project Dashboard
In the Project Dashboard, you can easily see all the studies in each project (folder), sorted by date, creator, participants, or study type. You can also filter by study type, create new studies, or move studies to other projects. Plus, you can filter by your own studies or all studies (for all accounts). Finally, you can access the highlight reels created for that particular project, making it easy to review your findings.

Projects can be accessed in two ways – Publicly and Privately – and are dependent on how the project creator initiates a project:
- Publicly: This means that all team members have access to the project and can view its studies and information.
- Privately: This means that only members who have been specifically invited to the project by the project owner or super-admin will have access to the project’s information.
These permissions are helpful when you want a study (or a series of studies) to remain hidden for the rest of the users, or certain users specifically, which is true even if you belong to a specific team (as seen in multi-team version)! This can be specially useful in the single-team version when teams are not available.

Have more questions? Contact your Userlytics Account Manager, and they will be happy to help.